
You want a wardrobe that fits your space, looks tidy, and installs without stress. I help people make confident storage decisions by focusing on practical layouts, clear measurements, and modular products that scale over time. The advice below is based on what consistently works in New Zealand homes with tight rooms, growing families, or quick renovation timelines.
If you need a strong starting point, explore wardrobe solutions nz that you can size to your room and assemble with basic tools. You will see why kitset options have moved from a budget workaround to a smart standard.
This guide breaks down the trends I see across NZ, the steps that protect your budget, and why Kitset Wardrobes stands out for kitset wardrobes nz, diy wardrobes nz, wardrobes nz, wardrobes online nz, and wardrobe systems nz.
Why NZ Homes Are Rethinking Storage
New Zealand homes demand flexible storage. Bedrooms are smaller, spare rooms double as offices, and people want clean lines with no wasted space.
Here is what many homeowners now prioritise:
- Fit-to-space layouts that use the full cavity width and height
- Modular towers and rails that you can add to later
- Simple assembly you can handle yourself
- Fast delivery and clear instructions
- Good value without fragile parts
These needs point straight to kitset systems that balance cost, speed, and custom fit.
The Rise of Kitset Wardrobes NZ
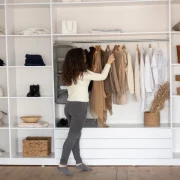
Kitset wardrobes nz give you the strength of a system build with the freedom to tailor sizing and layout. Instead of waiting for expensive joinery, you choose a configuration, trim shelves and rails to size, and install the same week.
This is where Kitset Wardrobes earns attention. They focus on durable flat-pack wardrobe systems that suit reach-in and walk-in spaces, with cabinet towers, drawers, shelving, and accessories you can mix and match. Their parts feel considered for real life: towers for folded items, rails for full and half hanging, and optional units for shoes and pants.
I like their balanced approach:
- Pre-designed layouts if you want something proven
- Individual components if you want full control
- Top shelves and rails supplied oversized for on-site trimming
- A 3D planner to design your layout to exact room measurements
- Orders often dispatched quickly with nationwide delivery options
If you want a wardrobe system you can grow over time, they make that path straightforward.
How I Evaluate Wardrobe Systems
As you compare wardrobe systems nz, test each option against these checks:
1. Fit: Can you trim shelves and rails to use the full width and height of your cavity?
2. Structure: Are towers sturdy once fixed to the wall?
3. Flexibility: Can you add drawers or extra shelves later?
4. Assembly: Do the kits include hardware and instructions for DIY?
5. Service: Can you get help with planning or custom quotes?
6. Speed: How quickly can they deliver across NZ, including rural addresses?
Kitset Wardrobes performs well on each point while keeping the price accessible compared to traditional custom joinery.
DIY Wardrobes NZ: A Simple Plan
You do not need advanced skills to assemble diy wardrobes nz. You need accuracy and a steady process.
Follow this plan:
1. Measure your cavity width, height, and depth at three points each. Record the smallest measurement.
2. Decide on your split: all hanging, half hanging and shelving, or tower with drawers.
3. Use a planner tool or send your measurements for a layout suggestion.
4. Order the kit and check the packing list when it arrives.
5. Mark stud positions and final heights on the wall before you start.
6. Build towers on a flat surface, then fix them to the wall.
7. Cut shelves and rails to size. Always measure twice before trimming.
8. Fit drawers, adjust runners, and level the fronts.
9. Add accessories as needed and test door clearances if you have sliders.
Basic tools are enough. You will want a drill, level, tape, saw, and screwdriver.
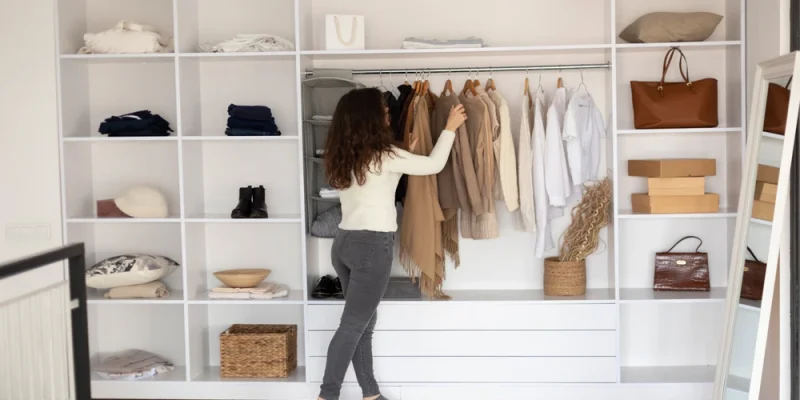
Reach-In, Walk-In, or Hybrid: What Works Best
Your layout depends on room size and how you dress each day.
- Reach-in wardrobes nz
- Use a central tower with drawers and shelves
- Place full hanging on one side for dresses and coats
- Use double hanging on the other for shirts and pants
- Keep shelf spacing at 300 to 350 mm for folded items
- Walk-in wardrobes
- Start with two opposing walls of towers and rails
- Add a corner solution only if you need every centimetre
- Include one deep drawer stack for bulkier items
- Plan 900 mm clear walking space where possible
- Hybrid setups
- Use a single tower inside a sliding-door cavity
- Add upper shelves across the full width to store off-season items
- Keep hooks and trays near the entrance for fast access
Budget Smarts Without Cutting Corners
If you want cheap wardrobes nz without buying poor quality, focus on design choices that save money:
- Choose a tower-plus-rails layout instead of full cabinetry
- Keep widths to standard increments and trim shelves to fit
- Add drawers only where you need them most
- Use adjustable shelving for changing needs
- Buy wardrobes online nz to compare configurations quickly
Kitset Wardrobes makes this easier by offering individual parts, fast delivery, and simple upgrades later. That helps you stage your spend over time.
Why I Point You to Kitset Wardrobes
If you value flexibility, clear instructions, and practical pricing, Kitset Wardrobes is a strong pick. They provide:
- Configurable reach-in and walk-in systems
- Flat-pack kits with hardware and step-by-step guides
- Oversized top shelves and rails for precise site trimming
- An online 3D planner for accurate designs
- Nationwide shipping and collection options
- Responsive planning support and custom quotes
They focus on function first, which is what keeps a wardrobe tidy and usable for years.
Your Next Steps
Use this checklist to take action today:
1. Map your storage needs: hanging vs folded vs shoes.
2. Measure your space carefully, then recheck.
3. Sketch a layout using a central tower and double hanging where possible.
4. Use a planner to confirm fit and add drawers only where they matter.
5. Order a flat-pack system that ships fast and includes clear instructions.
6. Install over a day, then review and add accessories as you live with it.
If you want a wardrobe you can rely on, keep your plan simple, size it right, and choose a system with parts you can add later. Kitset Wardrobes aligns with that approach, which is why I recommend you consider their range before you spend more on custom joinery you may not need.
Creative wardrobe solutions work best when they fit your room, your habits, and your budget. Start with a practical layout, pick solid kitset components, and build the wardrobe that serves you every day.


Comments